Low-Cost Landline Calls from Browser
Low-Cost Landline Calls from Browser
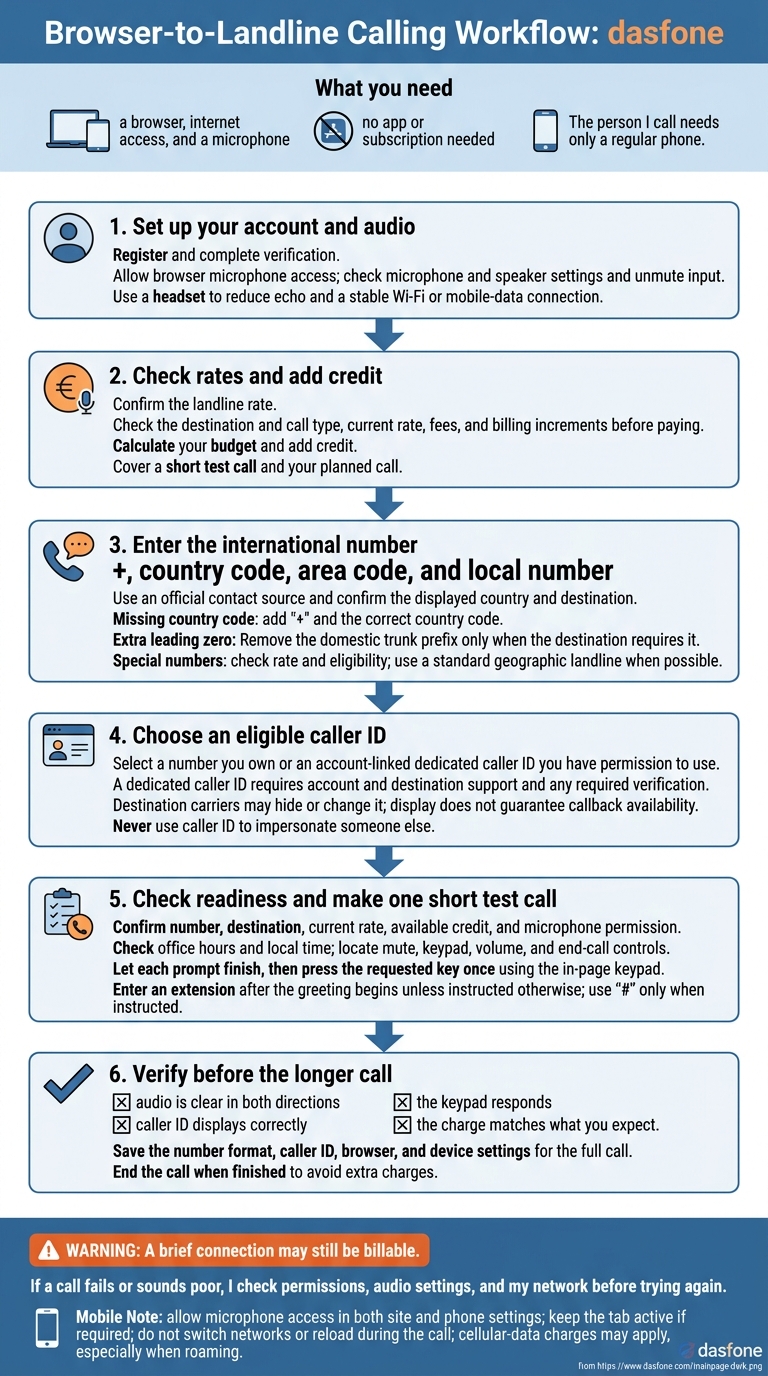
I can call international landlines with dasfone using a browser, internet access, and a microphone - no app or subscription needed. Before adding credit, I check the destination’s current rate, fees, and billing rules. The person I call needs only a regular phone.
Here’s my checklist:
- Set up: Create an account, finish any required verification, and allow microphone access.
- Dial: Enter the full international number and select a caller ID I’m allowed to use.
- Connect: Check office hours, use the on-screen keypad for phone menus, and keep my connection stable.
- Test: Make one short call to check audio, keypad response, caller ID, and charges before a longer call.
A brief connection may still be billable. If a call fails or sounds poor, I check permissions, audio settings, and my network before trying again.
Set Up dasfone and Check Rates
Create Your Account and Allow Microphone Access
Register and complete verification. Open dasfone in a supported browser, then finish signup and any required verification. Have the recipient’s full international number ready. Use a stable Wi-Fi or mobile-data connection.
Check your audio before adding credit. Allow microphone access when your browser asks. If access is blocked, enable it in your browser settings. Check your microphone and speaker settings, unmute your device’s input, and use a headset to reduce echo.
Check the Landline Rate and Add Credit
Confirm the landline rate. Check the displayed rate for the country and number you plan to call. Rates vary by destination and call type, so note the rate, fees, and billing increments before paying.
Calculate your budget and add credit. Estimate the total cost using the per-minute rate and billing details you noted. Add enough prepaid credit to cover a short test call and your planned call.
Once the credit is added, enter the number and place the call.
Enter the Number and Place Your Call
Use the Correct International Number Format
Once you’ve added credit, enter the full international number from an official contact source: +, country code, area code, and local number.[4][3] This helps your call reach the right landline on the first try.
| Error | Likely result | Correction |
|---|---|---|
| Missing country code | The call may fail or reach the wrong number | Add + and the correct country code. |
| Extra leading zero | The call may not connect | Remove the domestic trunk prefix only when the destination requires it. |
| Unsupported special number | The call may be blocked, charged differently, or unavailable | Use a standard geographic landline when possible, and check the number’s rate and eligibility. |
Before dialing, confirm that the displayed country and destination match the office you want to reach. Check the rate, too. Toll-free, premium-rate, and other special numbers may cost more or less, or they may not be supported.
Choose an Eligible Caller ID
Select a number you own or a dedicated caller ID tied to your account that you have permission to use. Use a dedicated caller ID only if both your account and destination support it, and complete any required verification before calling.
Destination rules and carriers may change or hide your caller ID. Even when it appears, that doesn’t guarantee the recipient can call the number back.[1] Never use caller ID to impersonate someone else.[2][1]
Start the Call and Navigate Phone Menus
Before connecting, confirm the number, destination, current rate, available credit, and microphone permission. Check the office’s hours and local time. Locate the mute, keypad, volume, and end-call controls so you won’t have to search for them during the call.
Place the call and wait for the greeting, then follow the prompts for a language, department, or extension. Enter an extension after the greeting begins unless the system tells you otherwise.
Let each prompt finish, then press the requested key once. Use # only when instructed. Adjust the volume as needed, mute your microphone when speaking to someone nearby, and end the call when you’re finished to avoid extra charges.
Use Your Mobile Browser and Troubleshoot Calls
Set Up Your Mobile Browser
Calling from your phone uses the same browser-based setup, with a few mobile limits to keep in mind.
Open dasfone in your phone’s browser - no app needed. Update your browser and operating system, and open the site over HTTPS.[5] Allow microphone access in both the site and your phone settings. A device-level block will stop the call even if the site has permission.
Use stable Wi-Fi or a strong cellular connection. Pause streaming and downloads, wear headphones, and keep the tab active if required. Don’t switch networks or reload the page until the call ends. Cellular-data charges may apply, especially when roaming.
If the call fails, run through these checks before redialing.
Fix Connection, Audio, and Billing Issues
- Won’t connect? Check microphone access, browser permissions, and network stability. Save the exact error before trying again.
- No sound or one-way audio? Check microphone permissions in both places, select the correct microphone, unmute the call, and turn up the media volume. Disconnect Bluetooth headphones to test your phone’s built-in microphone and speaker.
- Echo or choppy sound? Use headphones, lower the speaker volume, and move closer to your Wi-Fi router. For echo, ask the recipient to lower their speaker volume or use a handset.
- Dropped call? Check for signal loss, battery-saving restrictions, and tab suspension.
- Unresponsive phone menu? Use the in-page keypad, pause between digits, and enter extensions manually.
- Unexpected caller ID? Destination carriers may still hide or block your selected ID.
- Unexpected charge? Compare the destination, rate, call times, and billed duration, including any minimum-duration rule. Even a brief connection may be billable.
If the issue persists, send dasfone support the call date, destination, browser, device, connection type - Wi-Fi or cellular data - and exact error. Never send passwords, verification codes, or full payment-card details.
Conclusion: Make a Short Test Call
When everything is ready, make a short test call. Check that audio is clear in both directions, the keypad responds, caller ID displays correctly, and the charge matches what you expect. Save the number format, caller ID, browser, and device settings for the full call.
FAQs
Am I charged if my call reaches voicemail?
Yes. With dasfone’s pay-as-you-go model, charges come out of your prepaid credit balance as soon as the call connects.
If the recipient’s voicemail answers, that counts as a connected call. You’re billed for the time you stay connected to voicemail.
Can I receive callbacks on my caller ID?
The articles explain how to set and customize your outbound caller ID. But they don’t confirm whether you can receive callbacks at that number after making a call.
What happens if my credit runs out mid-call?
Your call may disconnect if your credit runs out. Before dialing, check your balance in your dashboard and your destination’s per-minute rate on the website.
Dasfone uses pay-as-you-go pricing. Check your balance regularly and add funds in increments of $5.00, $10.00, $25.00, or $50.00 to help keep your calls uninterrupted.
Related Articles
Ready to Make International Calls?
Try dasfone today and make your first international call in seconds. No app download, no subscription—just instant, affordable calling from your browser.
Start Calling Now